|
| City Street: Leicester, England. |
|
|
| Study in perspective: pencil on watercolor paper. |
| Night-school exercise. |
|
|
| ink and sable brush |
| Unfinished pencil sketch: Salt & pepper shakers. |
|
|
| A study in circles and curves. (CLICK ON THE PICTURES TO SEE LARGER VIEW). |
The exercise at the left was to train the eye to see shapes, lines, and curves, created
by various types of items in relation to each other. Notice the openings of things, like cups and bottle tops; depending
on how you view them the shape is always eliptical (a flattened circle, which is slightly bigger on the bottom half,
or if on it's side, the edge that's closest to you. And notice the shape of things as they appear when seen through
glass.
Look at everything around you and notice the circles, squares, cones; notice how different
light affects everything; sharp on hard objects, smooth and graded on soft things. Notice the shapes that form
in the folds of material. Making pictures is rather like playing with computer pixels, but much easier; the eye
actually sees like a camera lense. It takes in the shapes created by objects and spaces, and the way light
and shadow affects their appearance. We are not usually aware of this. One of the secrets of drawing is to observe
these shapes; rather than the subject itself. It will be invaulable to notice these things, if you decide to go
a step further and try your hand at painting.
Drawing your favorite things, is good practice. Things don't
move, unless you are doing a bowl of fruit and someone gets hungry, so every effort to draw inanimate objects helps develop
an eye for doing people. If you want to try drawing your favorite photo, make sure the details of the face are
really clear. Fuzzy pictures are only good if you want to try something Impressionistic. Take a close
look at the portraits in the gallery; see the shape of the eyelids, and the shadow it creates on the iris of the eye; plus
the spot you leave white to add sparkle to the eye. It is surprising how much you can learn about the effects of detail
by taking a good close look at someone elses work.
| The King Edward Hotel, King St. Toronto: pencil. |
|
|
| Perspective creates distance. |
<<to the gallery
Depth, dimension, and distance depend on the background being
smaller than what's in front; usually the distance needs only be suggestive by well placed lines, and shapes. Look at
the upper right street scene, this is a fair example of how ruled lines starting at a vanishing point (a dot near the
center of the paper), and radiate to points at the sides of the page. It is best to draw fine guidelines that
will help carry the eye along, for lining up windows and other architectural lines, and features. It helps to keep the surrounding
landscape in perspective too.
For a picture like the King Eddy (at the right), the vanishing point is way off the
left side of the page, so the angle of the architectural lines is what will help you to carry it off. When
you can't tell where the vanishing point is, this is where the math tool for measuring angles is useful; especially if
working from a picture. You can still take a fair guess when working from life, by holding the transparent piece up at arms
length, and lining the flat bottom against a horizontal line, and carefully moving over to the angle you want to measure.
Notice how the detail in the distance only suggest windows etc, with a few bold lines.
As an exercise in observation, look and see how much of architecture is made
up of squares, rectangles, and angles. If you hold a pencil out at arms length and measure the width of a rectangle
by lining the end of the pencil up with one edge, then put your thumb on the place at the other edge to gage the distance;
then turn the pencil the other way and see how many times the width goes into the length, it helps keep
your rough sketch lines in proportion. Now you know why artists can be seen holding their thumb out at arms length.
To get the right angle for a roof, or a shadow, take the transparent angle measuring
device from a math kit and hold it up, making sure that the bottom line is straight horizontally. You
will be able to see what the angle is and do a line on your page with the help of the tool, until your eye perceives it without
the device. If you don't have a math tool kit already it's useful to get one, as they
have nice small rulers and the ability to make perfect circles when you need them. They also come with a nice small
pencil, and an eraser.
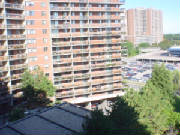
Enlarge these two photos, which I took for this exercise, they wouldn't win
any prize I know, but that doesn't matter. Examine the details you don't usually think about; notice the shapes created
by shadows and solid objects. Notice how the trees look a bit like clouds, in that you can imagine images in the shapes
created by light and shadow. Look at how the triangle shapes change on the balconies, at the different floors, above
and below eye level; especially the transparent ones.
(These pictures are blown up full size, you have to go to the top right hand corner to click the "close this picture"
button).

Did you notice the blocks, and angles of the parked
cars in the subway parking lot; the triangle formed under the bridge; the triangles formed in the design of the hydro
towers? Now look out of your own window, or off your balcony, and do the same thing. Notice all the shapes
of varyings sizes, and the angles. Notice the shape of everything, and how the time of day and weather changes the shadows,
or emphasises the shape.
There is no need to be bored when going anywhere, just looking at things you see
everyday in a different way, gives a surprising sensitivity to how pictures are
composed.
If you have a camera, take shots of the images that inspire you.
There is something about observing that is food to the creative process; it's like anything else, the more you meditate on
it the more skilled one becomes. This type of observation will be invaluable if your desire is to paint.
Take a trip to a big art gallery and see how the masters used their powers of observation.
Or go to the library and borrow some books on your favorite artists; you can also find lots of web sites with paintings that
will further this exercise. Check out the gallery sites.
Today it has been raining and that view up Victoria Park looks like an atmospheric Whislter
painting. When there is a mist on the ground, the outline of trees, and buildings are noticeably paler as they get
further away. This emphasises distance, and is integral to painting landscapes.
Keep up your observations, it will get more interesting as the change of season transforms
the world.
Impatient to get on with faces?
|
|
| Self portraits usually have serious expressions as you focus intensely. |
Use what you've learned and stand, or sit, in front of a mirror (see my results at the left).
Notice all the points of mathamatical division; the shapes, curves, lines, angles, and the shadows that give your face its
character. Start with light rough outlines, and focus point lines, where your features should be; put lines, or curves
where you face, head, or hair will come to. This is called blocking out, and the lines will be erased once you are happy
with what you get.
If you want to work from a picture, you can also draw a gridwork on the picture (virtical
and horizontal lines, spaced about 1/4 inch apart; then draw a gridwork on your sketch paper, 1/2-1 inch apart;
depending on how big you want it to be). Computers are great for this exercise, because you can print out the picture
if you got it from the net, or scan in the photo you want to do, and print it to do the gridwork; rather than mark up a photo.
The gridwork reveals the axact angle and placement of each feature. I did this with a picture of my dad in his
garden, as a birthday gift, because is face wasn't clear and I had to get the body shape just right. There is no question
who it is.
This is not cheating, even some of the great masters used transparent grids to view their
subjects. It saves time, and is less frustrating when accuracy is essential to the finished result.
| Early Mick Jagger. |
|
|
| A practice page, which gave me ideas. 8x10 |
| Work in reverse: template to see shapes. |
|
|
| Finished result was white chalk on black construction paper. |
Another trick that helps to get you started is tracing. I used to envy the talent
of a school chum; I would take her drawings, put a piece of paper over it and rest them against the window. Then I would
draw the outline, and finish it off to suit myself. This is a great confidence booster for the youngsters. I'm
not sure how long I did that, but after awhile I found I could copy her free hand. Which was the start of copying
from photos.
Something you can do to study anything that looks helpful to you from this site, is
save the pictures you like from my gallery and make a slide show out of them; view it full screen and try to
copy them as practice exercises.
As I think of all the things that should help you, I'm speaking from years of practice and
have forgotten what it feels like to be a rookie. If my tips are unclear in anyway, please e-mail me with your questions,
and I'll respond, and/or cover it in more detail.
You may also want to save the workshop pages in a reference file, as I will have to reconstruct them
for new tips, until I can get more disc space, so I don't know how long this information will be available.
|


