On this page I will use some stuff from my archive to demontrate some tips that will help you
bring your drawings to life. But first I'd like to say a few things about your materials. Get
the best quality you can. Work in a sketch pad and leave the pictures inside, it will keeps them from yellowing
as quickly. NEVER use scotch tape to attach your pictures, it ends up leaving brown patches on
the paper, as you will notice on some pieces from my archive.
Get some charcoal fixative, and spray your finished pictures to keep them from smudging.
In a pinch you could use hair spray. You will need a selection of pencils: the ordinary HB is good for doing guidelines,
rough outlines and details, but you will need softer leads for shading, and a charcoal pencil. Later you can experiment
with different weights and surface textures of paper, to add variety to your shading results.
You will also need a good soft eraser. A nice soft architects brush is great for sweeping away erasure debris, as it
doesn't smudge the work.
If you like to draw, doing people will be very tempting. When you see a photo that inspires you to capture something,
here are a few things to consider.

|
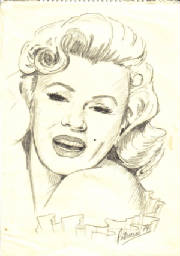
| Marilyn Monroe |

|
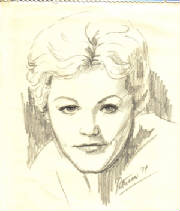
| Kim Novac |
Doing faces has some math involved: fractions and geometry, but don't let that
put you off. What that means is that generally the bottom of the nose is halfway down the face.
The eyes are halfway between the bottom of the nose and the hairline, and the mouth is halfway between the bottom of
the nose and the chin.
If you look carefully at faces you will notice how vertical lines help keep things in proportion
too. The round flare of the nostril lines up with the inner corner of the eye; the outer corner of the mouth sits under
the middle of the eye. There is usually the same distance as one eye between the eyes; if you look closely at my picture
of Patrick (in the gallery) you'll notice that his eyes are too close together. Don't worry about perfection, often
slight errors in the early details can be disguised by using shading to capture a recognizable expression.
It's all about the fun of doing it; not in being perfect. Your hand/eye coordination will develop as you practice;
something that's a bit off can have it's own beauty.
There are diagonal lines too: the outer point of the eyebrow follows the corner of the eye,
past the flare of the nostril to the middle of the mouth; the line across the top of the brows, and down the other side
of the face form a triangle. This helps when drawing profiles too.
From the side: the bottom of the ear sits level with the bottom of the nose; depending
on the nose, there are always some variations in faces. The top of the ear sits level with the eyebrow. Look at
the picture to the right. Kim's ear is not level with her nose, because she is looking down; you can see the top of
her head. In a case like this you look for another point on the nose that lines up horizontally to help you keep the
features in perspective.

Shading is what gives your drawing a three dimensional appearance. The observation of
shapes is important here too; I speak more about that on the next page.
I find it easier to start with the eyes, once I have the outline and features in place.
I'll start with the HB pencil and shade in the direction of the shape. This picture of my son, close up, demonstrates
what I mean. A good clear picture helps to capture the shape of the eyelids, and other features. If you want to
soften the areas you are working on, use your fingertip to smooth out the shading; you can go with the shading or against
the grain, using the lead on the paper to shape your mid skin tones. You can always lift out a highlight with an eraser;
to bring out a cheekbone, or the nose and chin highlights.
That sparkle in the eye is harder to recapture, so when you draw the eye do a little circle
where it will be. When you fill in the iris, be careful to leave the circle white. You can also use white
chalk, or pastel to add your highlights at the endl
When I have the rough shapes formed by the contours of the face, and the shadows on the skin, I'll
go with a softer pencil to draw some darker lines, created by character features, which help bring out the shape of the features.
Usually I will have more light detail worked into the hairline, so I can work from the center outward; to keep me from smudging
what's already done.
Working from pictures is great, because you can turn the picture and the work upside down to
finish the hair. Looking at it from this other perspective often reveals to you where your shading needs to be adjusted.
As I go along I'll use softer pencils for the deepest shadows, until I'm satisfied with what
I've produced.
Check out the pencil studies in the gallery, there are some good examples that show the results of these tips; Bruce
Lee, and the Rodeo, come readily to mind.
<<BACK TO THE GALLERY
NEXT>>
|

